
Troll Hunter – Storm Studios Learn how ZBrush enabled Norway based Storm Studios to breathe life into one of Norway’s most iconic denizens.
Norway is the place many trolls make their home. They nestle in the high peaks of mountains near the Fjords. Some of these trolls are nuisances to the farmers and locals. Some trolls are mean and nasty. These are the trolls you should stay away from! Some people, however, aren’t that smart...
“Troll Hunter” is a Norwegian-produced movie that will be making its way to the United States in the not-too-distant future. Much like “The Blair Witch Project”, it tells its story in a documentary style that puts viewers right in the action, face to face with the “mean and nasty” variety of creature. Watch the movie trailer, then continue on to our interview with Storm Studios: one of the effects houses that brought these trolls to life.
We can’t promise that the interview will be as exciting as the movie! But we can promise that it’s full of interesting information about how ZBrush fit into this production pipeline where multiple studios were all working together to breathe life into one of Norway’s most iconic denizens.
Could you begin by telling us about yourselves and your company?
Storm Studios is the largest supplier of VFX for feature films in Norway. Our services range through conceptual development, art direction, VFX on-set supervision, animation to VFX production. We have provided visual effects for a number of successful feature films as well as numerous commercials. Storm was first known for the CG Animated Feature “Free Jimmy” and later known for the post production work on the Oscar® winning short film “Peter and the Wolf”. Now we have finished our first creature-heavy production: “Troll Hunter”.
Artists interviewed:
Martin Andersson - Lead Modeler/ Lead Asset.
Henrik Karlsson - General TD/Grooming TD
Samuel Karlsson - Lead Compositor
Magnus Pettersson - Effects TD
What projects have you worked on in the past?
We have several Norwegian features and commercials behind us and we've also been fortunate enough to be working on some shorts as well. We worked on “Dead Snow”, which later became a huge hit in the U.S., “Max Manus”, a movie about the Norwegian resistance in WW2, several features like “Manhunt”, “Radio Pirates” and “The Olsen Gang Jr.” series. We’ve also done commercials for Subaru, Esthetique and a lot of other companies.


What is the premise for “The Troll Hunter”?
Martin Andersson: This is a mockumentary about three students who are doing a story on a local guy, Hans, who is rumored to be some kind of weirdo. All they want is an interview with Hans but he refuses to talk to anyone about himself. They stalk him for some time because they really want that interview and eventually figure out he is indeed a troll hunter. Suddenly they find themselves in the middle of the entire hunt and that is one bumpy ride! Of course the entire troll situation is covered up by the government. Not only is it a struggle against the Norwegian trolls, but also against the entire system.
How did you become involved in the movie?
Martin Andersson: We had worked with Filmkameratene earlier on “Max Manus” with a similar setup. The VFX was split between several VFX houses on “Max” and the same thing would have to be done with this movie. We are a small group of artists here in Norway so no VFX house could take on this task alone. The last couple of years we have also focused on developing a creature pipeline so naturally you would give us a call if you have some creatures for the big screen. The Norwegian CG society is like living in a small town where everyone knows everyone, so you have worked with employers and employees in the other studios earlier. A lot of us originate from the same schools. I actually started my career at Filmkameratene, the Producer of “Troll Hunter”.


What was the concept for the trolls, and how did you arrive at it?
Martin Andersson: When you're working with something this dear to an entire people you have to tread lightly. You are not really in a position to make any design that goes against the classic trolls we are all used to. If you've been a tourist in Norway you have probably been bombarded with trolls.
Of course you can say that no one knows what trolls look like anyway so you have some freedom, but it's limited. Imagine how pissed off people would be if you made a serious movie about ancient Rome and dressed them all up in pink ballerina costumes...
The design of the trolls was really a back and forth thing between the director, supervisors, our concept artist (Nikolai Lockertsen) and myself. Niko drew several designs during the creation process. I did the roughs in ZBrush based on maquettes Filmkameratene provided and Nikko’s drawings, but in the end the final design didn't end up like any of the concepts. It's close to the concepts, but the director didn't really know what he wanted. For reference I used anorectic boys and girls. Also photos of people who had been stabbed, blinded, attacked with acid and a lot of other references I don’t ever want to see again or talk about for the Tusseladd (Tosserlad). Fat Russian wrestlers were the main photographic source for the Dovregubbe (Mountain King). Quite a contrast! You get kind of immune after a while looking at the pictures, but the rest of the studio went "ewww, you sick, sick man" a couple times a day when walking by my screen which always had the photos open. The balance between fairy tale and realistic monster was also sensitive. We didn't want it to be a generic monster that could be any kind of monster but we also wanted it to be believable on-screen. When I needed I could also arrange sit-downs with our VFX supervisor (Colin Doncaster from Peregrine VFX) and Animation Supervisor (Jamie McCarter). They were usually available for discussions and sometimes sit downs were an extension of the dailies. Those sit downs where we drew on some prints and discussed shapes, muscles and what-not were extremely valuable. I'm glad I had a chance to work with them.
Which creatures were you involved with for the project?
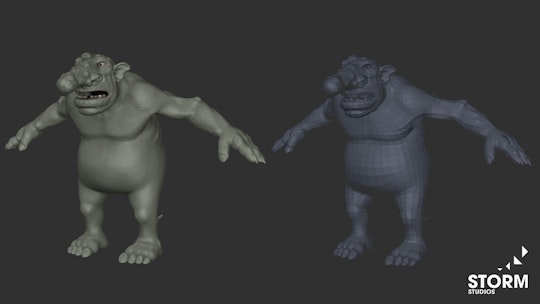
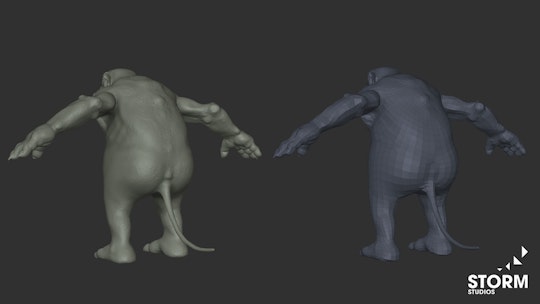
Martin Andersson: Storm Studios did two trolls for this movie. The Tusseladd is a 7-8 meter tall, three headed skinny troll and the Dovregubbe is a 3 meter tall fat one. The Tusseladd works alone while the Dovregubbe trolls are found in larger groups. In the forest, you can run but when you're stuck in a cave with a group of Dovregubbe trolls you're in for an experience to tell your grandchildren. If you get out of there alive, that is.

Were there any major challenges that you encountered? If so, what were they and how did you overcome them?
Martin Andersson: Oh, heads were rolling; digital heads. At one point the Tusseladd had his three heads merged into one clump, true to the original design. After some time the director wanted separate necks for the heads. This was a huge change and I had to go all the way back to the base mesh to alter it. Most of the detail I had already put in I could re-project with ZBrush's projection features. That was a life saver! Starting everything over wouldn't really have been an option.


Did the fact that three different effects houses were used pose any special difficulties?
Martin Andersson: Not really. We worked on our trolls while they worked on theirs. The external overall VFX supervisor (Øystein Larsen) and the Post-Production Producer (Marcus Brodersen) were visiting all the studios frequently to keep a total overview of how the material developed. It was very exciting to finally get to see the other studio's trolls because we had very few meetings where all the studios showed what they had been working on. We were all focusing on our own trolls.
From the video that's been seen so far, it looks like much of what we see of the trolls is with night vision and shaky cameras. Did this make your work easier, or more difficult?
Samuel Karlsson: From a visual effect stand point, getting plates shot in cloudy daylight, adding your troll(s) and finally creating the night vision look on the comped shot would for a number of reasons probably be more straightforward than adding the effect the way we did it. We actually used a night vision troll on a night vision plate. Seeing the way the night vision device distorts the footage is quite harsh and also different in each channel, producing aggressive chromatic aberration. Added to that, there is heavy noise (also distorted), plus static noise/dirt. And from what you can see, the footage is not really sharp and crisp, either. All these things make the tracking part a bit trickier and more tedious.


From a compositor's perspective, the difference between working with night vision plates or not is a bit different. There are some things you can't completely copy correctly, like the way shapes and colors interact and bleed into each other when you apply a night vision device to the camera. Meaning, the adjacent pixels to the introduced troll in the plate should have an effect on the troll when converting to night vision and the area around the troll in the plate should be affected as well. So you end up having to mimic the look you believe is correct to the extent you can with the tools available. However, if you instead had the "luxury" of having to add the night vision effect in the end on the comp, on both the plate and CG, you still have to match your shot to a certain look or more probably to an existing night vision plate. And having seen how unusual the way night vision behaves sometimes I wonder if in certain cases it is easier to match a comparatively small area of the shot to your plate rather than the whole shot to other night vision footage.
So to answer your question, from a compositor's point of view, perhaps it's more difficult, and then again maybe not. I wish we would have had the time and budget to investigate both scenarios in depth. But in the end, you naturally have to respect and trust the decisions made for the scenes.
How much was ZBrush used for the trolls? In what ways did you use ZBrush?
Martin Andersson: ZBrush played a big role in this production. I spent most of my time in ZBrush while Maya was used for the base mesh and Topogun for retopology. To create the displacements we used a combination of the color texture map painted by Stig Saxegaard and further sculpting. I applied the texture map as a displacement in ZBrush and projected the details onto the mesh itself. Then I continued sculpting stuff like bark and warts and how the skin would wrap around rocks etc. The layers also gave me the opportunity to do the final tweaks necessary. If you take a closer look you can also see that the bark is left out of the sculpt. I tried out HD sculpting, but couldn’t figure out a way to sculpt in HD while at the same time being able to see the texture. I exported my displacement for the main parts and then drew the rest in Photoshop.

Espen Nordahl, our CG Supervisor for the show, wrote a new generic shader for Renderman that was able to handle all the displacements I could throw at him. He also set up turntable shaders and render scenes so we could see the progress with the same setup for every iteration. For the petrified sculpt, I used the last frame of the animation as a starting point so we could read the silhouette we wanted, changed the hands and feet in Maya creating a new base and took it in to ZBrush for sculpting. Then displacement maps were extracted and Espen continued with texturing and shading of that character till it was good enough to put on screen while Magnus was using it to do the petrification effect.
I had never used ZBrush before this project so I didn't take advantage of the total experience ZBrush gives you from concept to finish. Consider the project an "introduction to ZBrush" project for me. Now, after being a part of the beta team for ZBrush 4 and using ZBrush on more productions and at home I feel I have much more control of the software. If I were to do a similar creature today I would for example use ZSpheres to get a quick armature for my sculpt. Using ZSpheres also lets you focus on the artistic aspect because it leaves out the base mesh creation. If the topology goes all nuts you can always use the retopo tool in ZBrush to tweak it some and jump right back into sculpting.

About how long did it take to create each troll?
Martin Andersson: The trolls went through so many design stages and changes that it's hard to say how much time the actual work took exactly. I worked on the project for a couple of months on and off. After delivering the trolls I worked on a couple of other productions and then later I went back to sculpt the petrified troll. We also worked on fur and render setups simultaneously.
Could you tell us about your fur pipeline?
Henrik Karlsson: I was working with grooming on both the Tusseladd and the Dovregubbe on Troll Hunter. It was quite a challenge due to a lot of circumstances.
We had been working on our grooming pipeline quite a bit before Troll Hunter but that actually only included fur. In Troll Hunter this was far from enough to achieve the look we were looking for. For the final look PaintFX and Fur needed to be able to blend -- they needed to move similarly. They also had to take into account the displacement derived from ZBrush, which they of course each did in different ways. For Fur we use Joe Alter's Shave and Haircut for Maya, which is a fairly straight-forward plugin although it has its ups and downs.


The Tusseladd started out with a lot of paintFX and fur to match the concept, but as we moved on with the look’s development we reduced most of it and ended up with very scarce hair growth all over his body and a little thicker growing hair on his chin and the top of the heads. The Tusseladd proved a big challenge due to the heavy displacement on the model. Here is where we had a big advantage through ZBrush. When Martin updated the displacement maps for the Tusseladd he could extract black and white maps for me which I integrated into my control maps. That way I could adjust the paintFX and fur to make sure it only grew where it was supposed to. For example, the legs and arms had very heavy bark displacements and naturally there would be no fur growing in these areas, except for some in the larger cracks.
The Dovregubbe was very different to work with in comparison to the Tusseladd. First of all, he was to be covered in fur and paintFX which of course was both a challenge and a treat for me. I started on a complete fur groom first on the Dovregubbe and covered the entire body in fur. After that I created a lot of paintFX brushes and applied them randomly on the troll. I extracted a placement map of the paintFX (based on the UV’s) and removed these areas from the fur, or at least reduced the amount of fur.

Since we wanted to have dynamics on the Dovregubbe I needed to work out a system for controlling the paintFX and fur so that they actually move together. (Of course we had dynamics on the Tusseladd as well but due to the low amount of fur and paintFX this was never really a problem.) After trying a lot of different solutions I ended up using the simulated hair curves from Shave and Haircut to drive the paintFX simulation. It was not perfect since there was actually no interaction between the paintFX and Fur. I did set up a workflow for interaction as well but we just didn't have the time available to use it since it slowed down the process. In the end we didn't even use dynamics on the paintFX since it actually looked better without the paintFX being dynamic.
I have worked with Martin on several creature projects now where he uses ZBrush and I must say that it is really easy to work with in our pipeline. Since we use Renderman the displacement rendering in Maya is almost free and we get all the nice details we want. Applying the groom based on the displacements is very easy and so far it has really helped us achieve a very procedural workflow. (Smiling) The only thing I miss right now is a really sweet grooming tool inside of ZBrush!
In the VFX breakdown we can see one of the trolls turn into stone. How did you do the petrification of the troll?
Magnus Petterson: For doing the petrification effect we took the final frame of the animation into ZBrush where Martin used it as reference for creating a stone sculpture of the posed Tusseladd troll. I then used Houdini to set up a procedural system that transformed the animated model into Martin’s sculpt. This was done by first projecting the animated model points to the sculpted model and with some manual modeling tweaks make it look almost identical to the sculpt.

Now that I had a mesh that had the same number of vertex points as the animated model it was fairly easy to make the troll procedurally animate to become the stone sculpture. The effect was initially controlled by using an animated texture map (made inside of Houdini’s compositing) that then was mapped onto the mesh as point colors that in turn were controlling where the mesh should turn into stone. This way we had a fast and good way of previsualize the effect. By just changing the animation of the texture we could change the way the troll turned into stone. This procedural setup also made it as easy as pressing a button to get the previz of the petrification whenever the animation changed.
This animated petrification mesh was then exported from Houdini out to Maya where PaintFX was being used to copy out pieces of stones on top of the mesh for finally being rendered with Renderman. This ensured us that we got proper shadow and lighting on the petrification effect since our pipeline is Maya/Renderman based and includes light shaders written in-house, gobos, paintFX, fur shaders and other goodies.
To finalize the effect the compositing team had to apply their magic touch, too. They had to blend together the render of the animated troll (that doesn't petrify) with the effect render where he turns into stone and the final sculpted stone-troll render.
Did ZBrush save you time? What other benefits came from using it?
Martin Andersson: One of ZBrush's key features that will always save you time is the TransPose tool. Again, this being my introduction to ZBrush I wasn’t aware of all the ZBrush utilities so I was kind of lurking around. However, I don't think we could have done this project without ZBrush. Real-time feedback on 18 million polygons with several layers of details worked very well. Also, ZBrush was able to "save" me with projection tools when I had to tweak the design. I never had to start over no matter what the director suddenly wanted; I just found ways of tweaking the existing mesh. On future projects I believe using ZSpheres will save us a lot of time.
What are your favorite ZBrush features? Why?
Martin Andersson: It's hard to pick one favorite feature that is THE feature. I am extremely happy about the new "Clay Buildup" brush. This is my main brush now. I love the TransPose tools because you can so easily change proportions and pose your models. ZBrush 4 introduced the ShadowBox and that is a really great tool for quickly setting up a base for your sculpts, both hard surface and organic. I use ZSpheres to get my bases up, but I've seen more and more artists using the ShadowBox even for organic busts. The new clipping brushes are really adding the extra edge to hard surface sculpting and we've seen some amazing usages of the new features on the forums. The new boost given to the masking brushes has also increased my speed a lot. I can’t wait to use the new Mannequins to do some previz with directors on future projects.
Do you have any ZBrush tips or tricks that you would like to share with the community?
Martin Andersson: My all-time favorite trick is a canvas technique Paul Gabory taught me during the beta of ZBrush 4. I have it written in detail in my tutorial in the ZBrush documentation files. (Found in the ZBrush 4 Documentation folder or in my beta thread at ZBC.) The basic idea is that you store a morph target, drop your tool to the canvas, then use the deformation tools like scale to create a difference mesh that calculates the changes between the main mesh and the one dropped on the canvas. By doing that I was able to carve out a big piece of wood for the body of my guitar. I never imagined the canvas would be that strong.


What features in ZBrush 4 benefit you the most, and why?
Martin Andersson: Ooh. A lot of hard questions here! Lately I have been using the Timeline to set up some viewport bookmarks. It’s really handy to be able to toggle through the most used bookmarks like orthographic front, side top etc. It’s also good that I’m able to bookmark areas that need special attention so I don’t have to navigate my way around all the time to reach the same area. I like to make a bookmark for a total view of the model so I can quickly jump back and forth. When you are doing detailing it’s easy to forget the whole picture...
I also have to mention the new masking tools again. They are really speeding up my workflow and it’s brilliant that we are able to Space-click to move the entire thing around. SpotLight will be used more and more in my workflow as well because the possibilities are endless. Matching hue, sculpting and painting with the images you load... I think that is just great. I recently used it making a rock for a feature here at Storm.

Do you plan to use ZBrush very much moving forward?
Martin Andersson: Short answer: yes.
Every time I pick up a script or a breakdown I instantly think about how I can solve those tasks in ZBrush. I recently used ZBrush to tweak models we received for a short film production. I had to clean up nine models that were outsourced earlier and I could have spent a lot of time in Maya or a little time in ZBrush. The move brushes really speed up tweaking and the Move Topology brush in particular is an absolutely brilliant brush. For all our creature work we will definitely use ZBrush as our main modeling tool. I want to use ZBrush for hard surface as well in the future and I hope we get some projects where I actually get a chance and some time to do that in ZBrush.
Are there additional ZBrush features that you want to explore for future work?
Martin Andersson: I always think of new ways for using ZBrush for our projects. Lately I've been exploring SpotLight and I consider using the ShadowBox for more hard surface modeling. I want to implement Shadow Box in the pipeline here. Thus far it works great for concepts etc. but for most hard surface models that require accuracy I'm still using Maya and Silo. What I am thinking though is that I can use Shadow Box and do a retopo to be able to get a good start and then tweak the accuracy later. I want to figure out if I can actually save time doing it this way.
When will we see The Troll Hunter in theaters?
Martin Andersson: I hear rumors about a U.S. release in 2011. I also hear Hollywood studios are fighting over the rights for the remake so these are not the last trolls you'll see.


Without giving up too much in the way of spoilers, is there a particular moment that we should really watch for?
Martin Andersson: A troll’s weakness is sunlight. Watch out for the sun - or simulated sun. (Grins)
Can you talk at all about future plans?
Martin Andersson: I can't really talk about the company strategy plans, but I can say that we always seek to improve artistically in addition to as a VFX Studio and we will be working on some pretty interesting projects in the near future. Make sure you pop by our website once in a while!
Is there anything else you'd like to share with the community while you have our attention?
Martin Andersson: First of all I just want to say that I’m really impressed with the community. I really like the tone and good feeling I get from browsing the ZBrushCentral forums. There are also some absolutely stunning works there! Keep posting and remember that you can create absolutely anything with this software. Your imagination is the only thing holding you back.
I also want to thank Pixologic for the opportunity to be a part of the beta team for Z4. I learned so much and being able to contact the developers directly was a huge advantage that made it possible for me to learn my way around the software. I also want to thank Michael Defeo for being an excellent teacher when I took his ZBrush class over at Schoolism recently. I learned so much those 14 weeks and he inspired me to do even more sculpting.